Introduction
Writing a catchy and successful blog post can be a hassle and it can be problematic at times. You sometimes might even feel like giving up altogether. Well, we feel you! Don’t throw in your hard work and dedication that have been put into your project/website until now just because you feel like giving up because we are here to help you. With the help of Writecream’s AI-powered long-form editor, you can write the whole article using the specialized tools present there in one place. Now you must think that it is a clunky and time-taking process, but we have got you covered! Using Writecream’s Long-form editor, you can write your article as quickly as 5 minutes.
You can go from scratch and still get the best results. Even if you have no idea about what you are to write about, the Writecream long-form editor will help you with that. From Blog Idea to the Blog Conclusion, you will get guidance for everything here.
Let’s Start!
Now that you know about the tool that can help you in more ways than are possible, it is time that you finally learn how to use it. We will be guiding you through your journey from ideation to the full article.
To get there, sign up for a free account on Writecream. You just need to enter your name, email, and password. Click on the Register button after entering your details. After you sign up, you will be taken to the dashboard. There will be a list of many AI-powered tools that can help you in various ways, we will talk about each of them in detail soon, but we are here to learn about the long-form editor this time. So, scroll down and click on the Long Form Editor tool. You also need to open a Google Doc sheet simultaneously in a new tab.
Determining the Blog Idea
If you don’t know what to write about and what your article should be, then using the editor you can determine that too.
Once you click on the long-form editor on the dashboard, you will see a Choose Use Case popup in the top-left corner in the Long Form Editor tool, click on it and select the ‘Blog Idea’ option from the dropdown menu. This will help the editor understand that you need help with determining the blog idea that you will be writing.
Now you need to add your company or brand’s name. Moving on, you have to write about what your company does and the value your product can provide, that is, your company or brand or product’s description. This will help the editor understand that what your viewers or subscribers would want to see and would engage better with. This is very essential as this defines what you will be writing about and will it help your brand effectively or not. So, you need to be careful while writing it, be clear about your niche and your brand value.
Now, you will be required to select a tone of writing. You can choose if you want your blog post to sound joyful, formal, humble, appreciative, inspirational, etc. This will help set a tone for your whole article. Enter this according to your past experiences with your subscribers or audience; what they engage the most with.
After entering all these, it is time you click on write for me and let the Writecream long-form editor do the rest. You will see a list of various blog ideas that the long-form editor has
suggested on the basis of all those details you have entered. Select a blog idea among those and copy it to the google doc.
It is important to note that if you have a blog idea already, you enter a one-line description of the blog post in the blog title section in the following format:
‘Blog Title: one-line description of the blog post’
Here we have attached an example showing how to generate a blog idea.
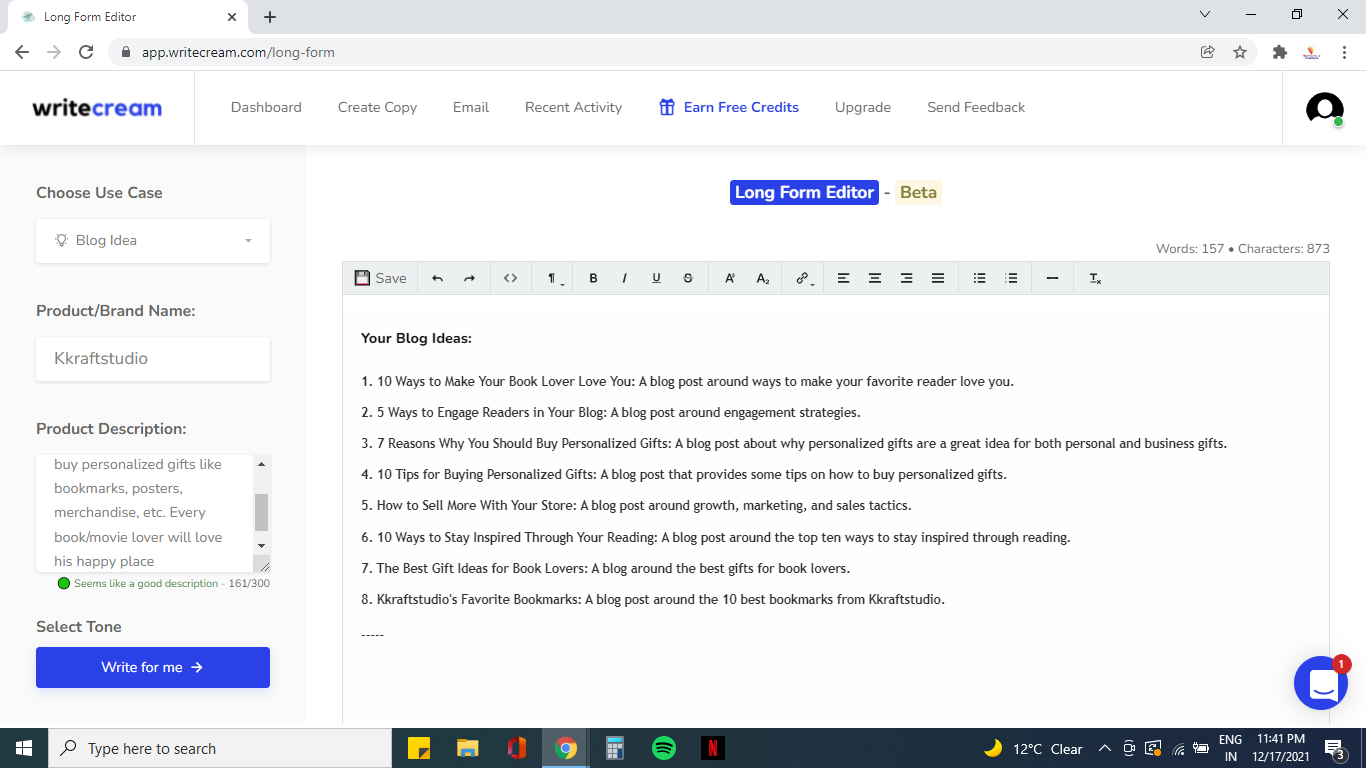
Say we pick, ‘The Best Gift Ideas for Book Lovers: A blog around the best gifts for book lovers.’ as our blog idea. Now we have to paste it to our google document and move on to generate our blog introduction using this blog topic.
The Blog Introduction
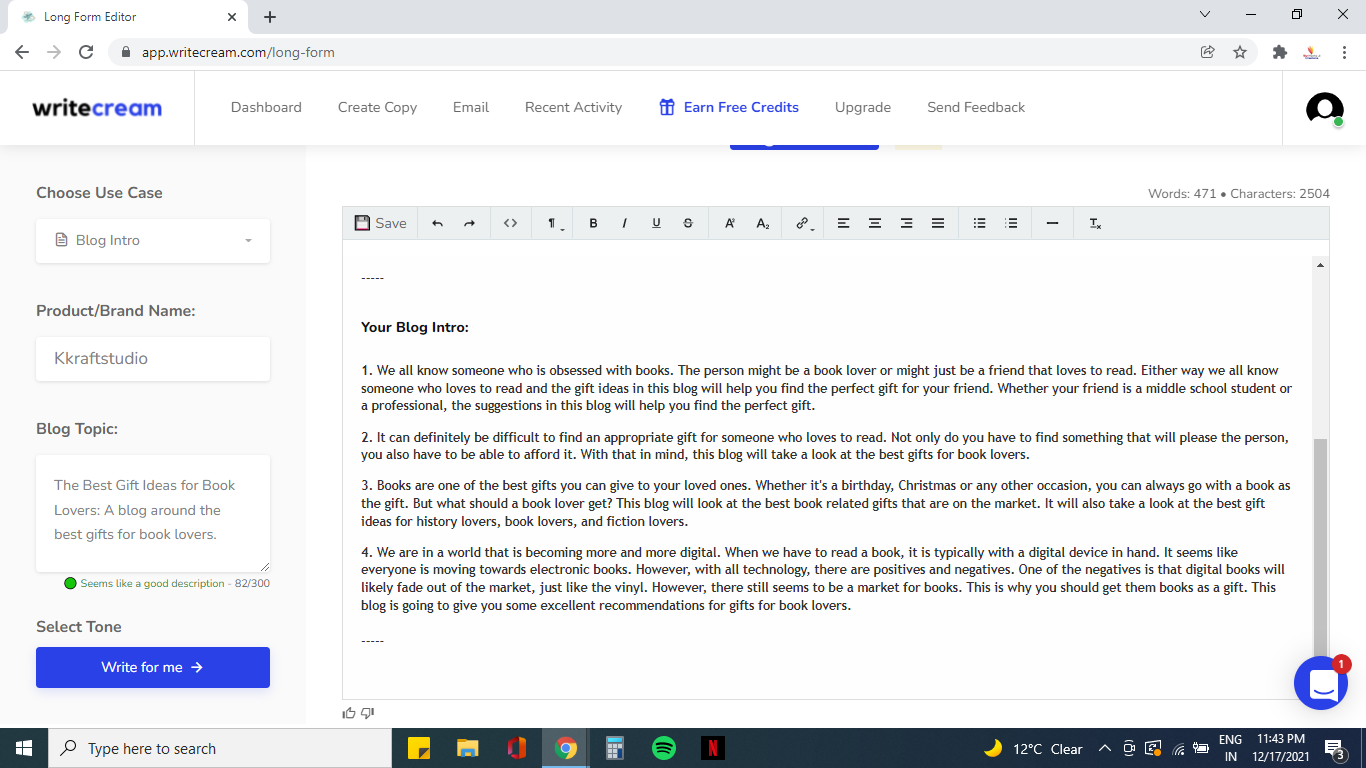
Now, after getting the blog idea, it is time to think about your blog introduction. So, you have to change the Use Case from ‘Blog Idea’ to ‘Blog Intro’ while the brand name stays the same.
After doing all this, replace the brand description with the blog idea or the blog title that you got using the writecream long-form editor. Also, after adding the blog title, change the tone of your blog as required.
Once you are done with the mandates, click on write for me. You will see a variety of introductions on your screen. Choose the one that suits your niche and your brand.
After choosing the intro you like the best, copy it and paste it into your google doc. Keep in mind that you select the intro carefully as it is the first paragraph of your article and it defines the layout of a blog that consists of section headings.
Here is the example. In this case, the brand name is the same while the blog topic has been changed to the blog title we generated in the previous step. Now, you have to select one paragraph as your blog introduction among these and move on to the next step.
Developing the Blog Outline
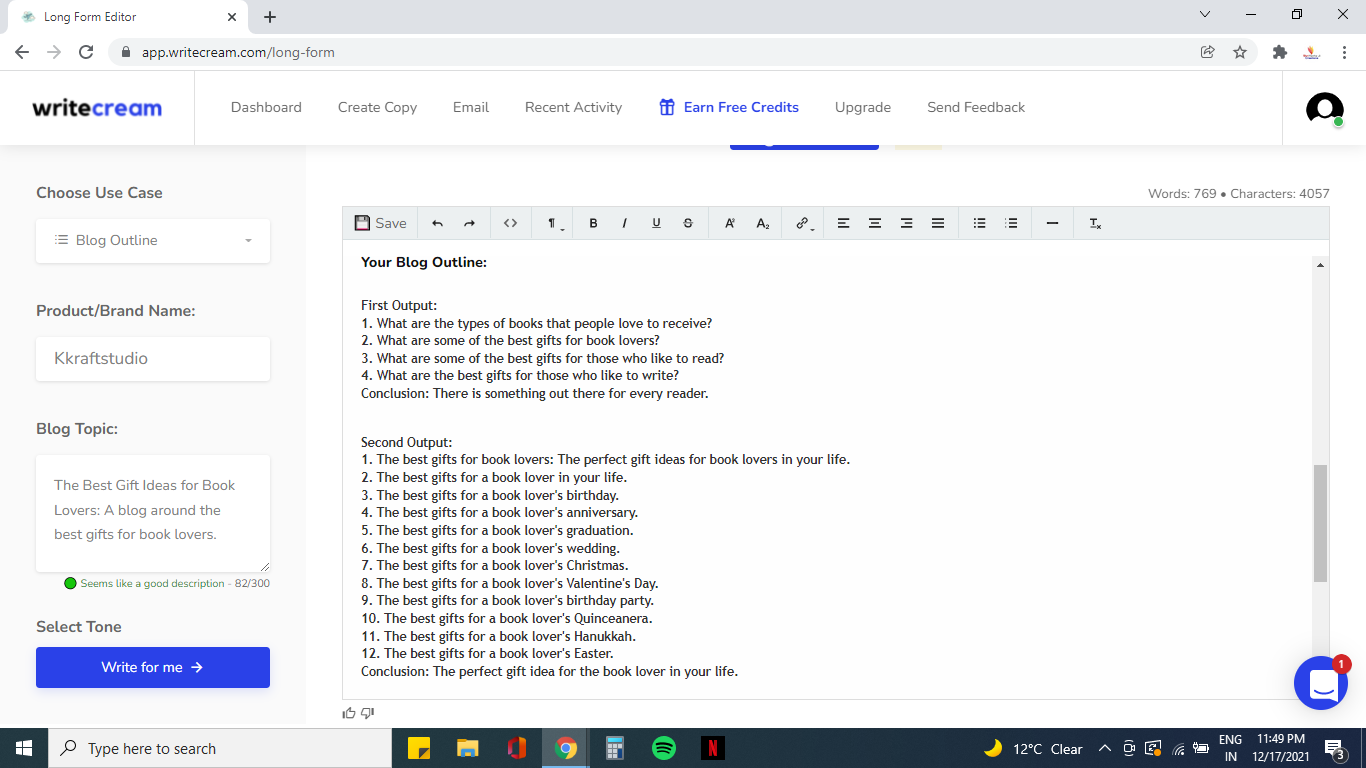
After you are done with the blog intro, it’s now time that you develop the blog outline next. To generate the blog outline using the writecream long-form editor, you know the drill. Change the Use Case from the blog intro to the blog outline.
Now, as everything else is already in its place, you don’t need to change anything else and skip directly to the write for me part.
You will see various outlines presented to you and you have to select one as you have done while selecting the previous cases. After selecting the outline, copy and paste it into your google doc.
As we have got the outline for the blog, we will now generate the text for each section, one by one. You have to choose the blog heading expander for this.
In the example below, you can see various outlines that are provided using the blog title that was generated in the first step. Now choose one among the list of these outlines and paste it to your google document.
Generating the text for each section
We have come a long way using the long-form editor to write your article. As we are done with generating the blog outline, we have to develop the text for each section that is there in your blog outline. Keep reading to know how to do that.
Firstly, copy the first section headline from the google doc. Now, in the Use Case section, select blog heading expander from the dropdown menu. As you might already know by now, the blog title remains the same while you have to paste the section heading under the section headline option you see there. Once you are done adding the section headline, change the tone of the section as required.
Now, after adding all the required entries, click on the write for me option and you will a number of outputs before you. Choose one of them and paste it into your google doc.
-
Our advice
We recommend you combine various outputs into one to generate a large piece of text for each section. It will help the word limit and the optimization of your article. If you are unsure of how to do that, then select some outputs and arrange them in a suitable manner and connect them using suitable conjunctions like ‘besides’, ‘in addition, etc. break them into paragraphs however it suits you. Blogs need a certain word count and keywords according to different SEO practices, you should always go according to what your SEO suggests and not blindly copy-paste everything.
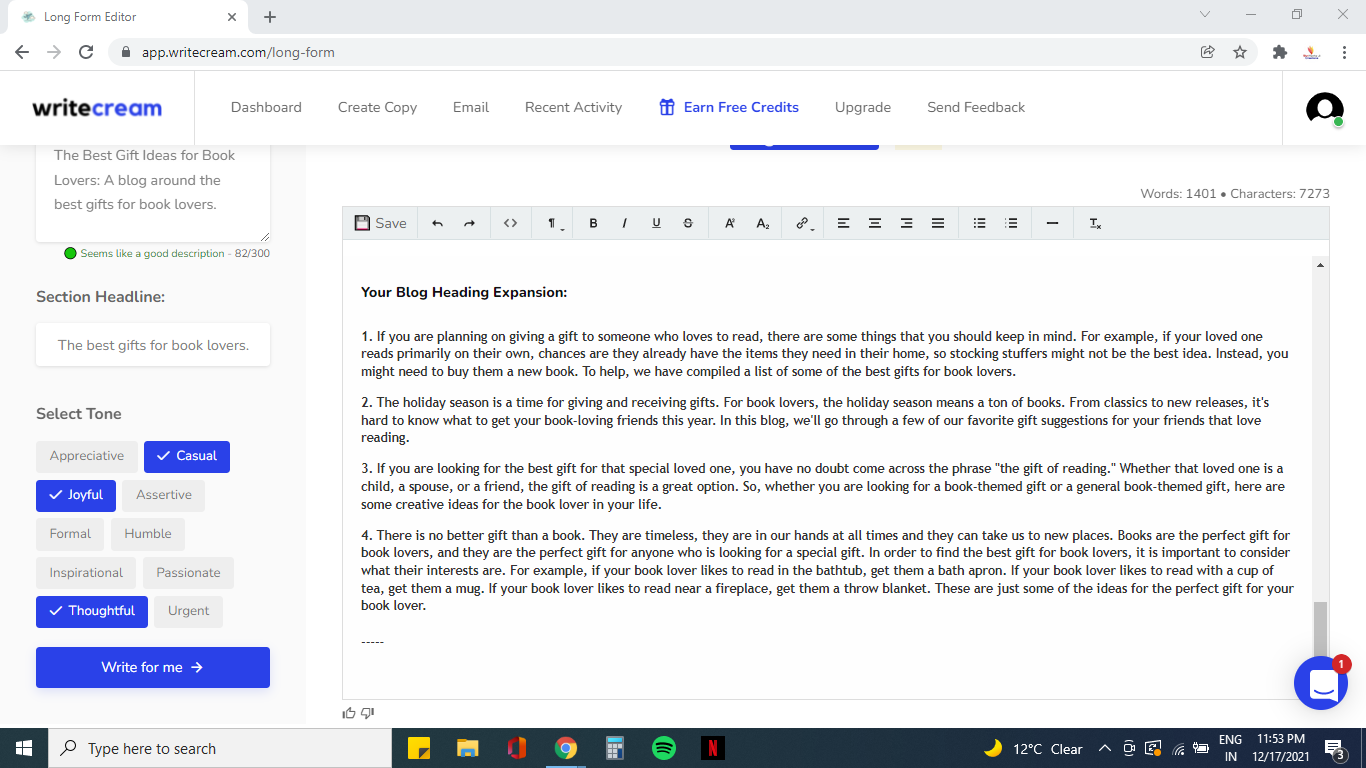
As you see that there are various paragraphs displayed under the Blog heading expander. It is possible that you want to combine two or more paragraphs into one. We will choose two paragraphs from the example above and generate a new paragraph by arranging them and connecting them accordingly.
‘The holiday season is a time for giving and receiving gifts. For book lovers, the holiday season means a ton of books. From classics to new releases, it’s hard to know what to get your book-loving friends this year. But one thing that we know is that there is no better gift than a book. They are timeless, they are in our hands at all times and they can take us to new places. Books are the perfect gift for book lovers, and they are the perfect gift for anyone who is looking for a special gift. In order to find the best gift for book lovers, it is important to consider what their interests are. For example, if your book lover likes to read in the bathtub, get them a bath apron. If your book lover likes to read with a cup of tea, get them a mug. If your book lover likes to read near a fireplace, get them a throw blanket. These are just some of the ideas for the perfect gift for your book lover. In this blog, we’ll go through a few of our favorite gift suggestions for your friends that love reading.’
See? So simple. We just took two paragraphs and combined them according to the flow.
The Blog Conclusion
Now, as you are familiar with the process, expand all the section headings following the same steps. To combine multiple outputs efficiently, we advise you to paste the outputs that you like into your google doc and continue your editing there. It will save you time and energy for switching between the two tabs.
It is possible that while editing you find out that the generated outputs can be better and there is room for improvement, in this case, you can click on the write for me option again and have a new set of outputs displayed to you within seconds. The editor displays a different set of outputs every time you click the write for me button. If you are unsatisfied with what you see, you can always opt to generate a new set of outputs.
Now that you are done with generating and editing the section headings, it is time you move on to generate the blog conclusion using the writecream long-form editor.
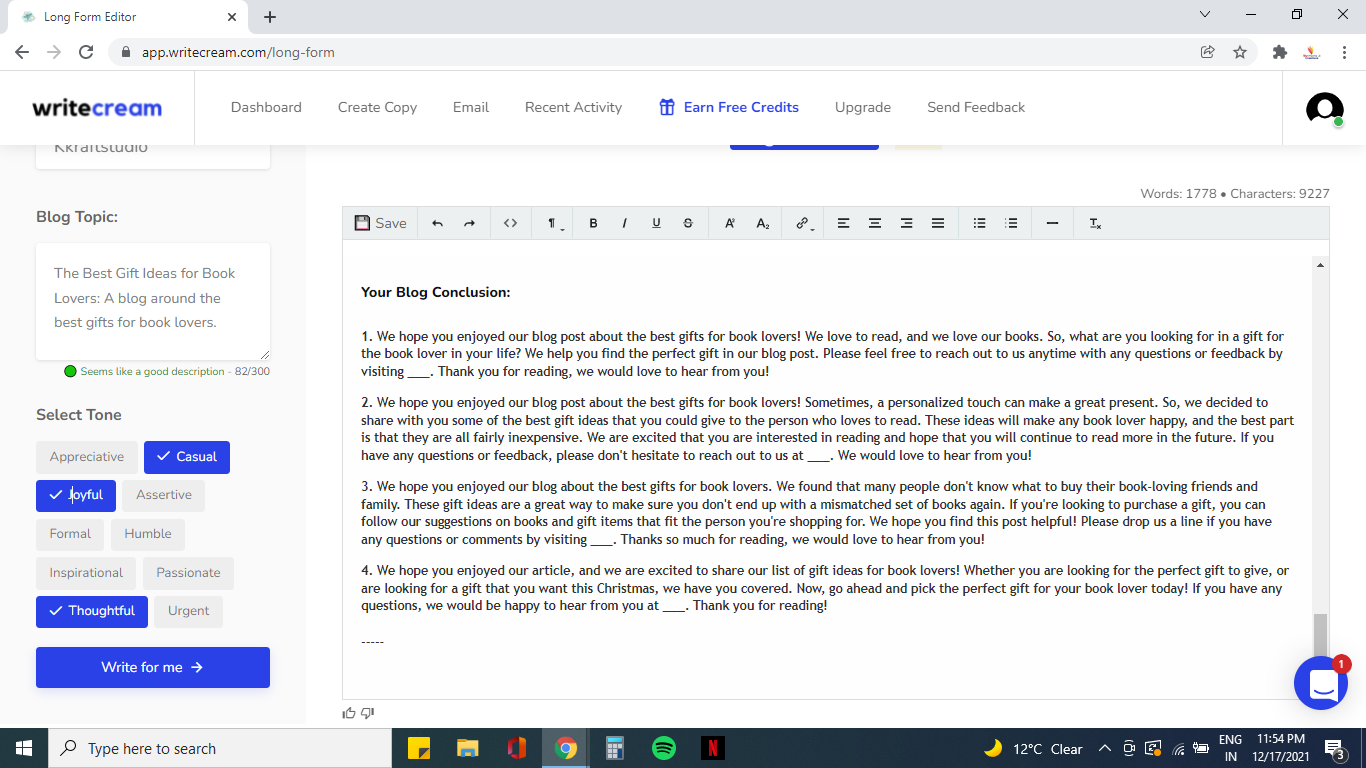
The steps are similar. You have to change the Use Case to the Blog Conclusion. As you have everything else already set according to your needs, you do not need to change it and directly click on the write for me button.
The rest is pretty simple as you know, you have to choose a befitting conclusion you like and paste it into your google doc. Bravo! You have written your first blog post using Writecream’s long-form editor tool.
Key Takeaways
As we have learned in this article, you can write the entire article using the long-form editor tool itself and you have all the tools available in Writecream in one place. Your content is autosaved every 5 minutes on writecream’s servers and you can access it from any device.
So, using Writecream, you can go from an idea to an article, all within a few minutes.

